
instantiator.dev
I'm a senior tech lead, writing about tech, volunteers, public safety, and collective intelligence. This blog contains articles, tools, code and ideas.
- Presence (tool) (in dev)
- ListSky (tool) (in dev)
- The Epistolorean (service)
- Consensus Games (service) (in dev)
- JSON to Smart CSV (tool)
- Escape the Review (profile)
- In this house... (calendar)
- A chat with Lewis (call)
Free AI-assisted coding 3: A basic prototype with Streamlit
tutorialIn earlier posts we set up a dev environment and a Git repository. Now we’ll create a small prototype from scratch using Streamlit.
Why Streamlit?
It’s worth talking about Python for a moment. It’s a popular choice for data science work.
I’ve worked in software development for a long time, but I’m not a Python expert. Like every language, it has strengths and weaknesses.
For data science, in particular, there are some versatile Python libraries that make it easy to manipulate and analyse large datasets. Because these libraries are popular, it helps data scientists and analysts to collaborate. Everybody speaks the same language.
Pandasis a library for working with datasets, managing tables of data asDataFramesNumPyis a library for performing operations on large amounts of data very efficientlyFor an introduction to both, see: Introduction to Pandas and NumPy (codecademy)

Streamlit is an open-source Python framework for building web apps. It is:
- Simple — you can just write plain Python, you don’t need other languages like HTML, CSS, or javasript
- Popular — there’s a large user community
- Well maintained — it’s actively developed by a dedicated team and has open-source contributors
- Well documented — there are plenty of guides and tutorials for working with Streamlit
- Fast to build with — you can create a running app very quickly
Streamlit lets you build interactive web pages, linked to code that runs data processing, with very little effort. That makes it ideal for prototyping.
Read more:
Prerequisites
In the previous tutorials, we set up your working environment. Please make sure you have:
- installed VS Code
- installed git
- cloned your repository and opened it in VS Code
Installing Python
Streamlit needs Python 3.8 or later. Check if you have it installed with:
python3 --version
Mac OS...
macOS often comes with Python 3 pre-installed. If not, if you have Homebrew installed, you can install Python with:
brew install python
If not, you can download the installer from python.org.
Windows...
Download and install Python from python.org. Remember to choose “Add Python to PATH” during installation.
Linux...
Use one of these commands, depending on your system:
sudo apt install python3 python3-pip python3-venv    # Debian / Ubuntu
sudo dnf install python3 python3-pip python3-venv    # Fedora
Creating a simple prototype
Open your project directory in VS Code, and then open a new terminal. This terminal will start in the project folder.
1. Create a virtual environment
A virtual environment keeps your project’s Python packages isolated from the rest of your system. Packages are libraries and tools, and it’s good to keep each project separate so that if you need a specific version of a package for a particular project, that won’t interfere with or break another project.
If you are not currently in the project folder in your terminal (you should be if it’s a new terminal), you can move to it with:
cd ~/src/my-project
Now create the virtual environment:
python3 -m venv .venv
Next, activate the environment.
For Mac OS / Linux:
source .venv/bin/activate
For Windows:
.venv\Scripts\activate
You’ll know it’s active because your terminal prompt will show (.venv) at the start.
2. Install Streamlit
pip install streamlit
pip is the Python package manager, and the word
pipitself stands for “pip installs packages”. That’s a recursive acronym, and… you’re going to have to get used to them! They’re everywhere in software development.
This installs Streamlit and its dependencies into your virtual environment.
| Package | What it does |
|---|---|
streamlit |
The framework itself — handles the web UI and reruns your script on interaction |
pandas |
Data manipulation library — Streamlit uses this internally, and you’ll use it for data work |
numpy |
Numerical computing — a dependency of many data science libraries |
plotly / altair |
Charting libraries — used for nice, interactive visualisations |
You can see everything that was installed by running:
pip list
3. Create the application file
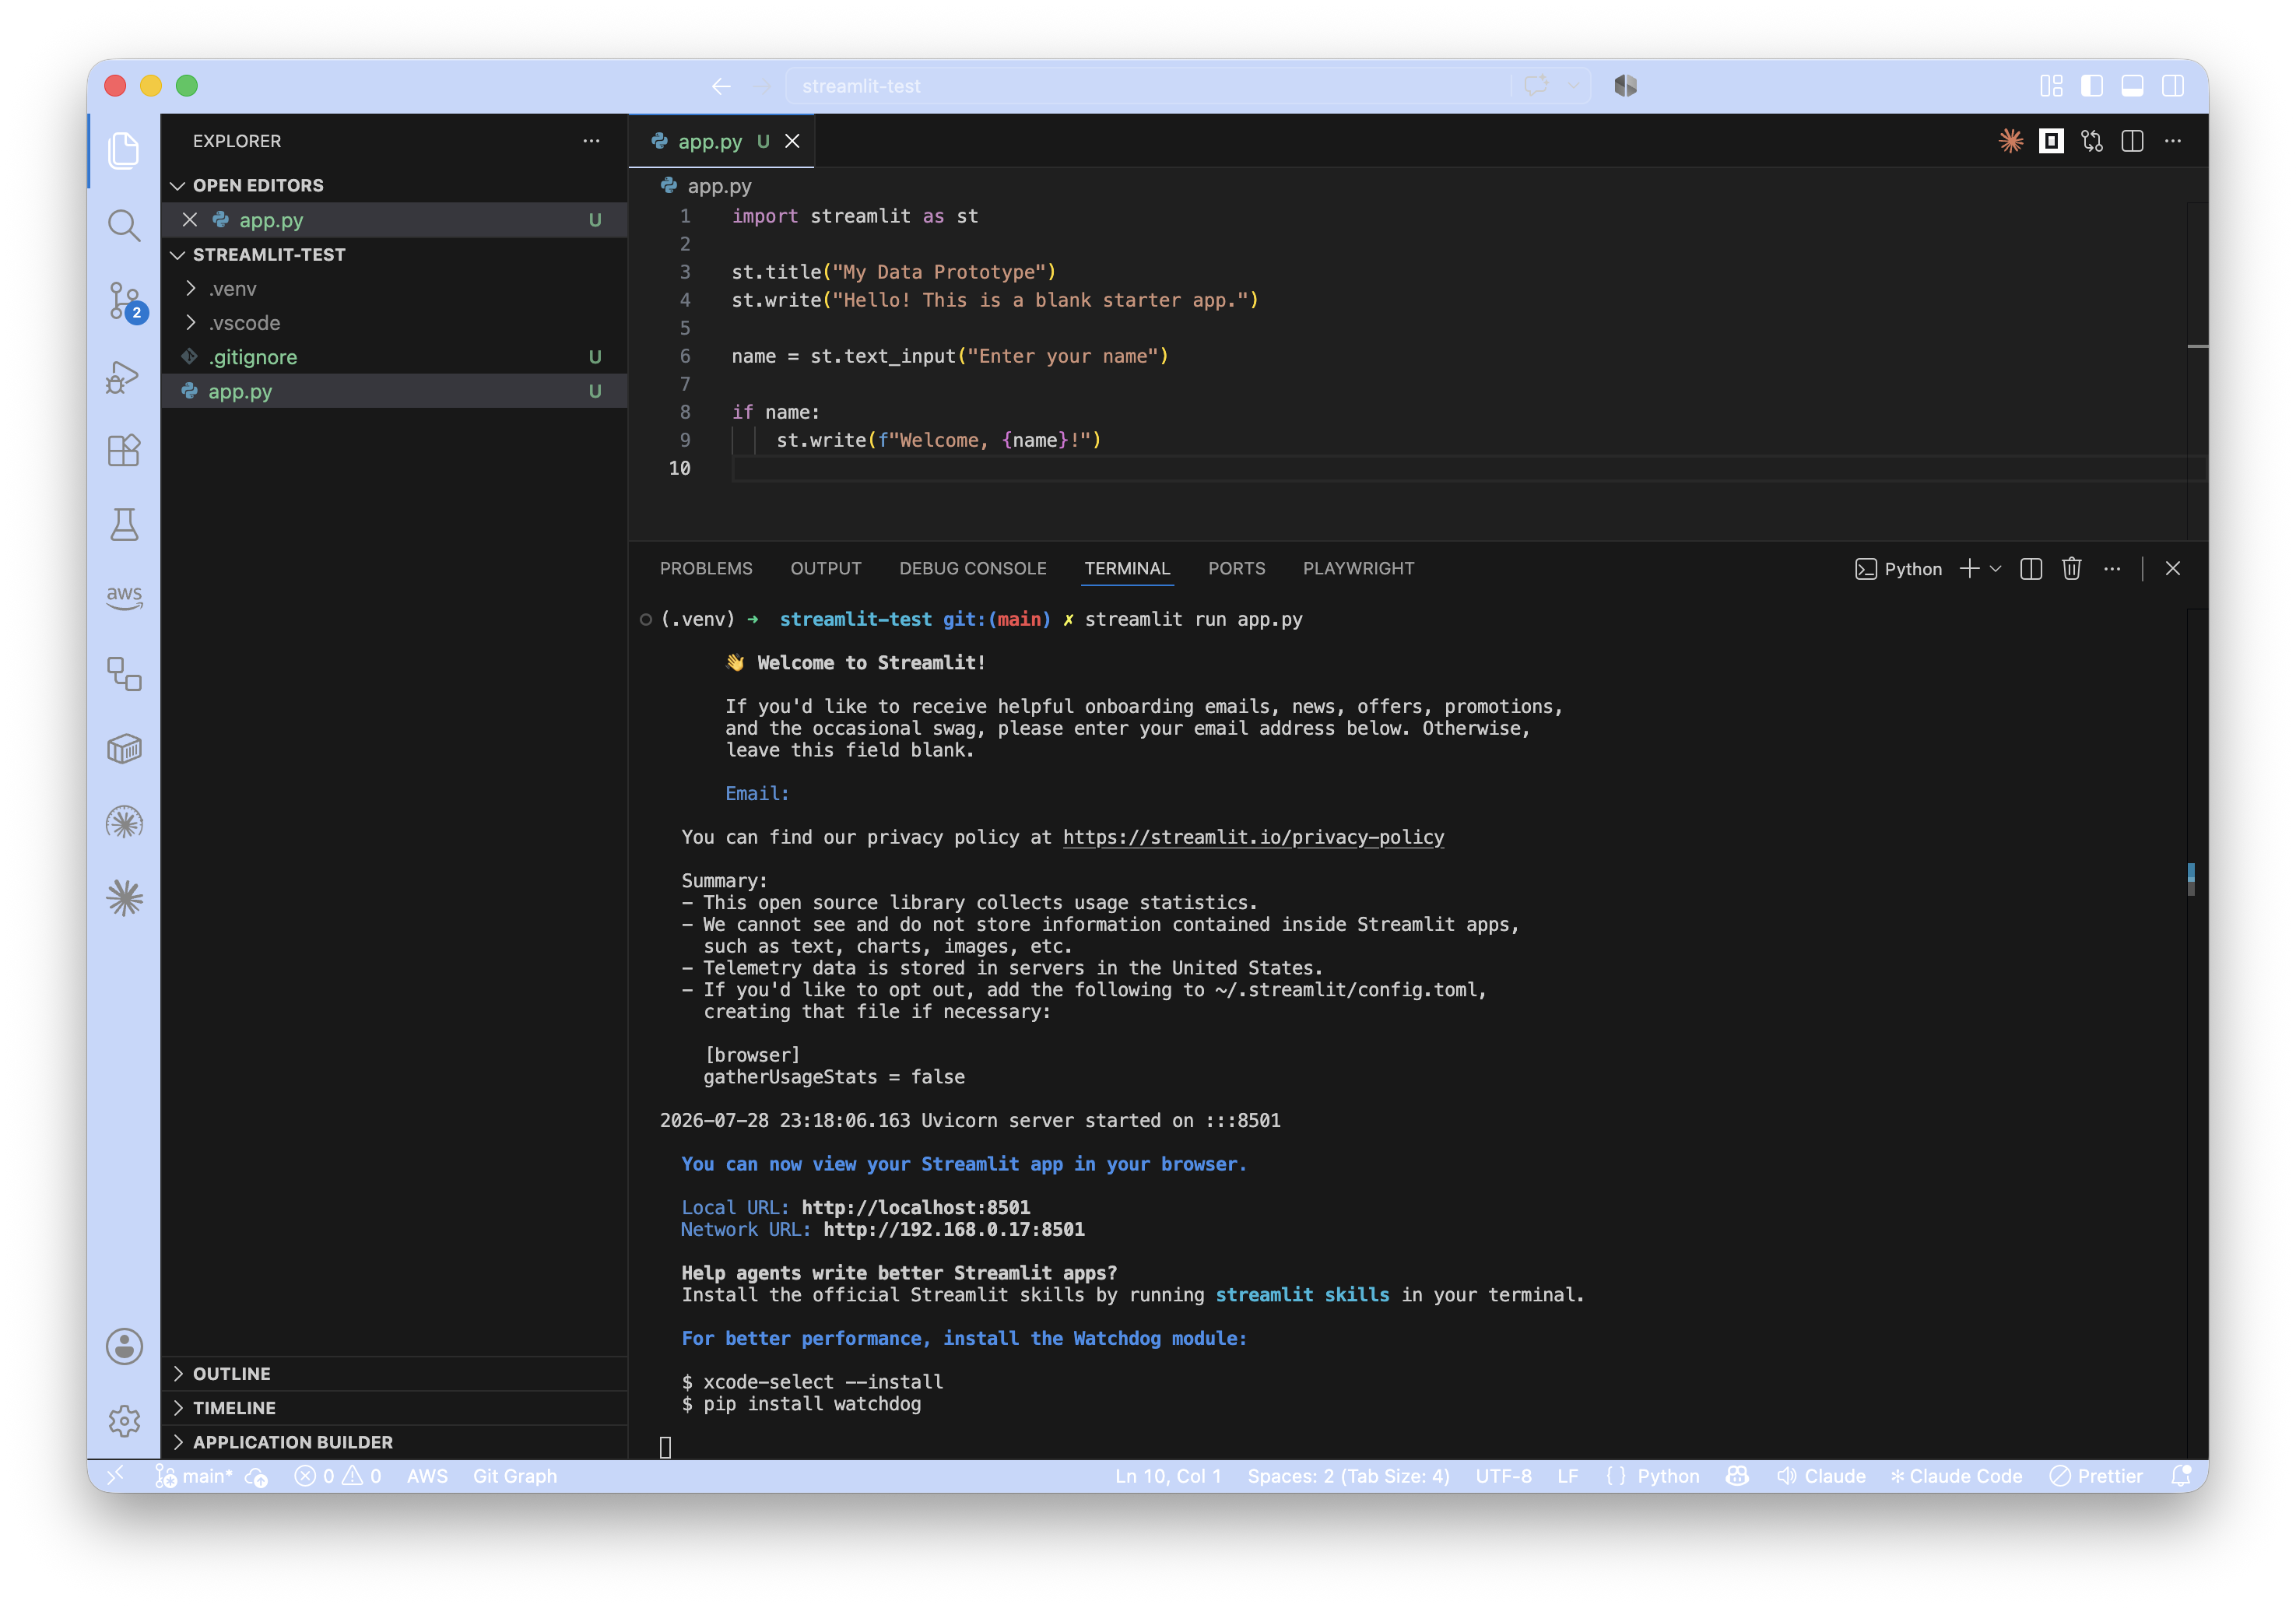
Create a new file called app.py in the root of your repository with this content:
import streamlit as st

st.title("My Data Prototype")
st.write("Hello! This is a blank starter app.")

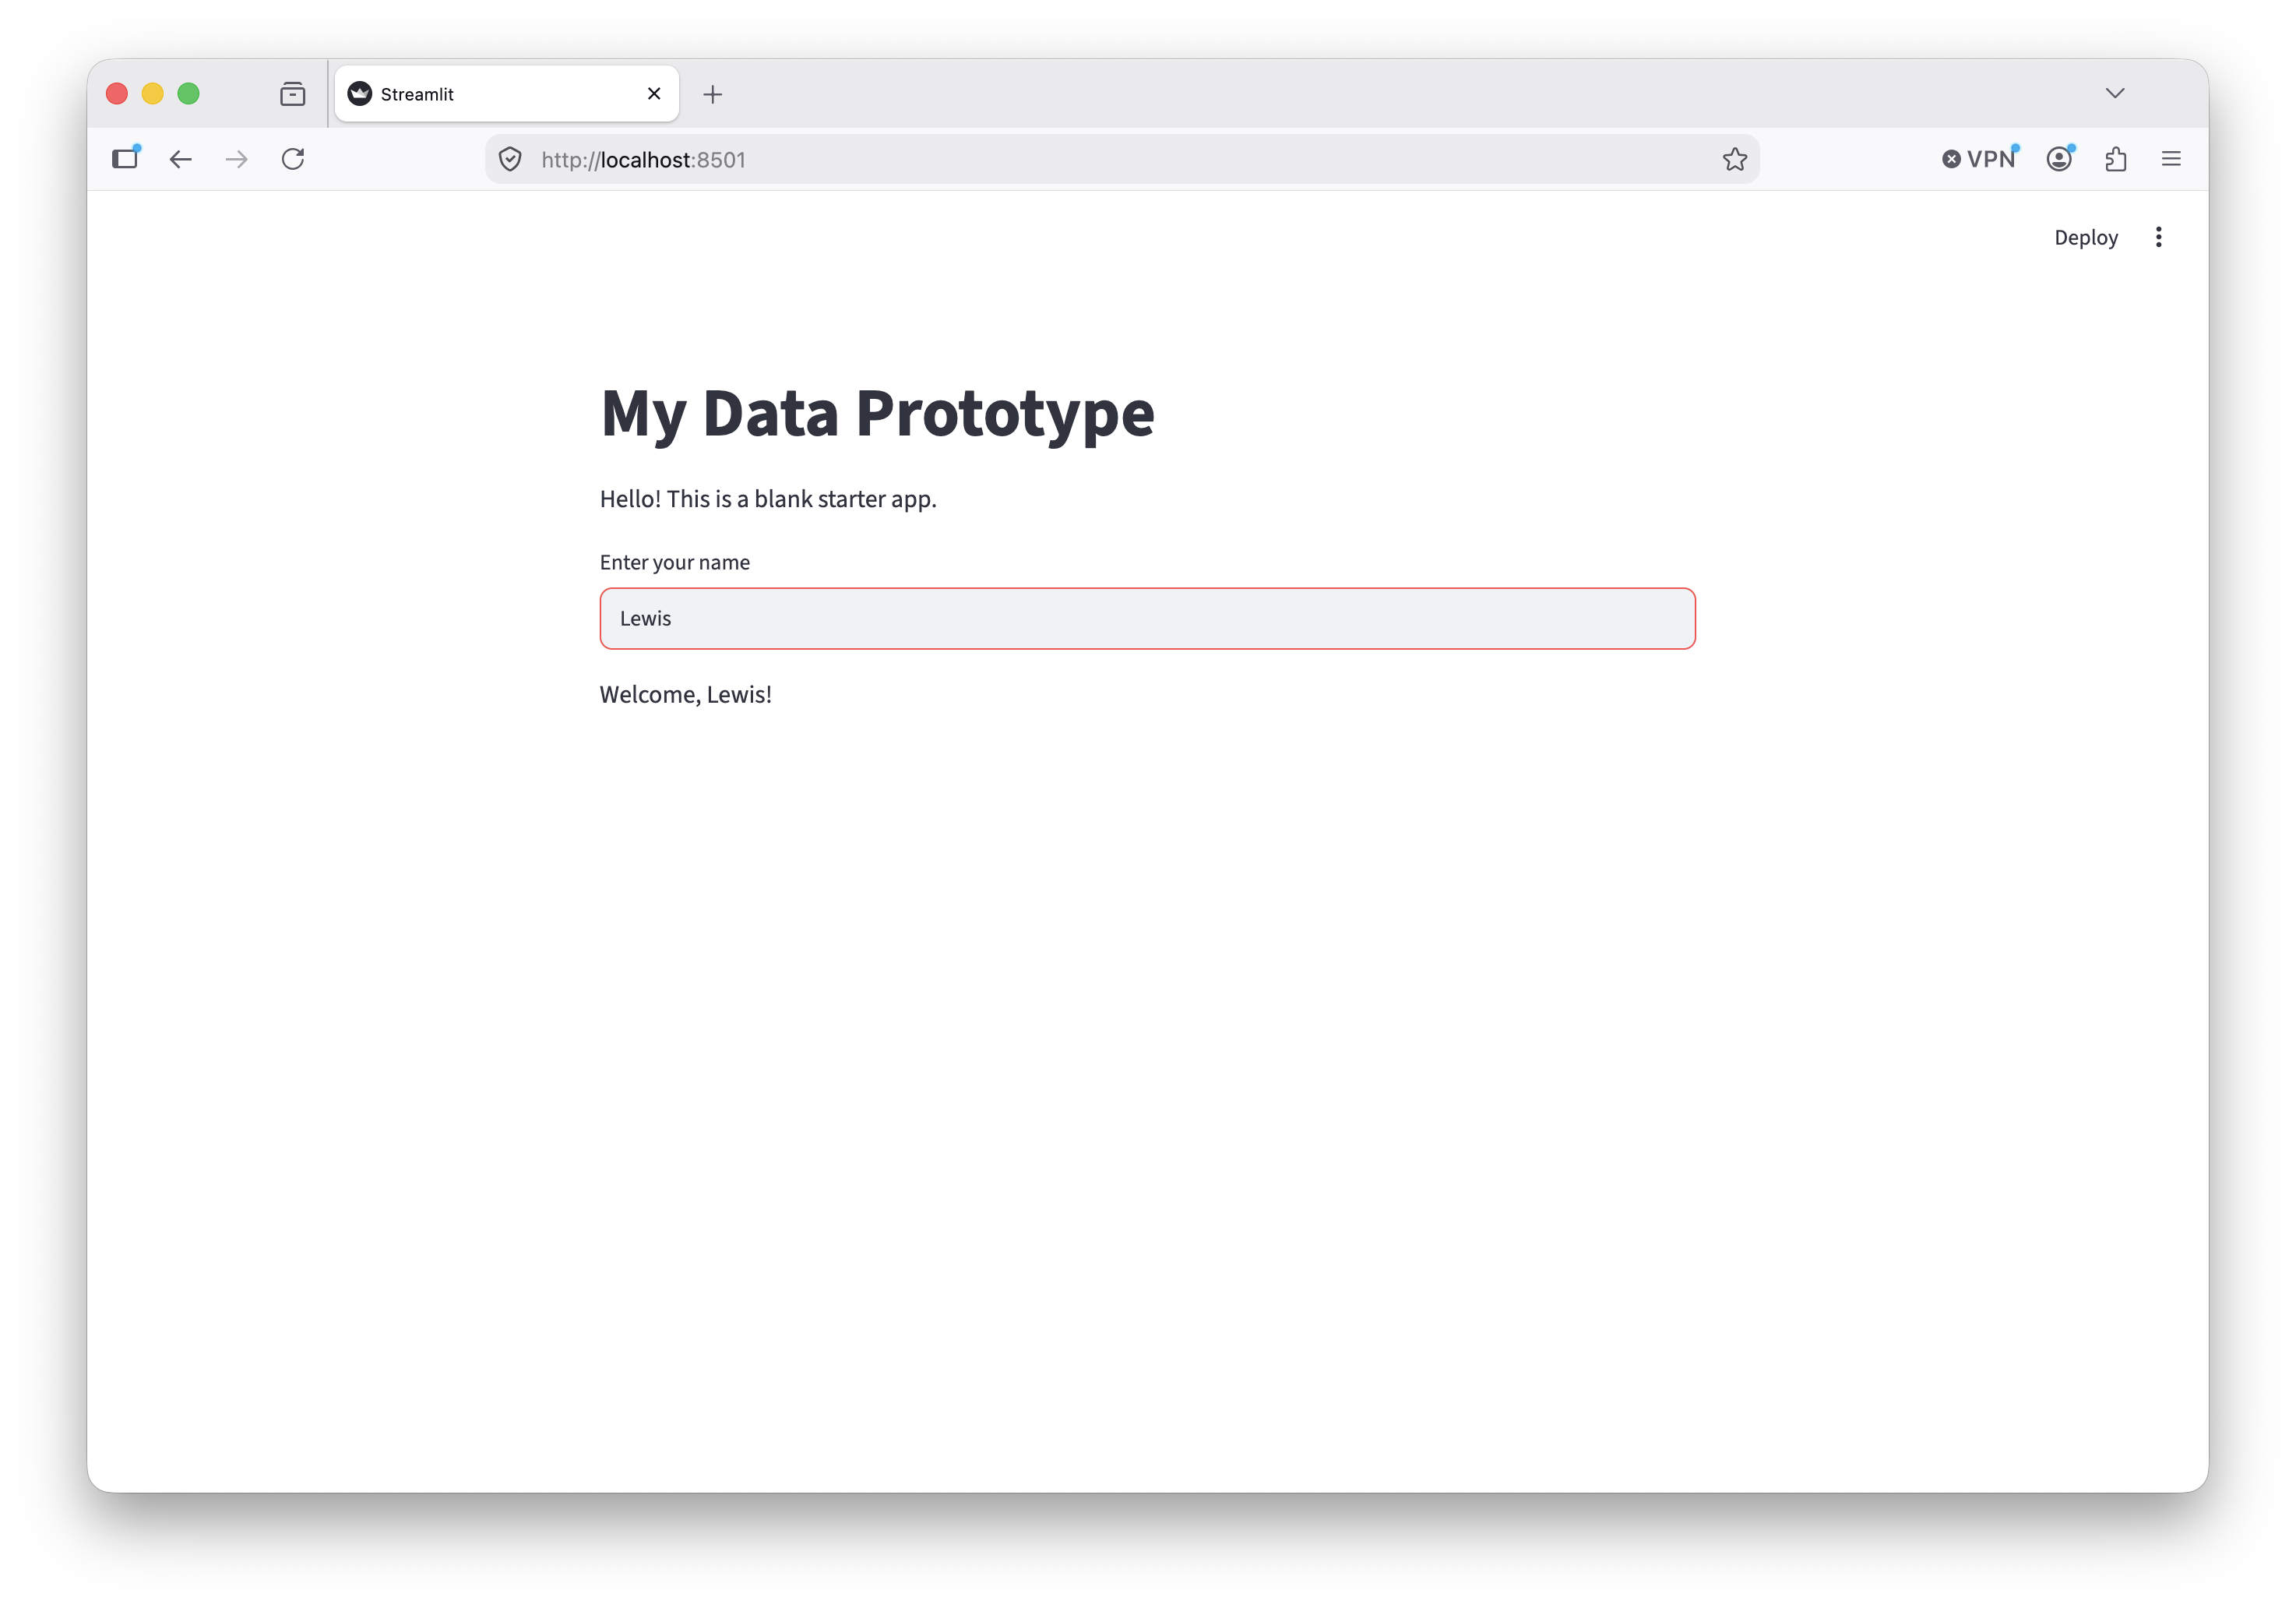
name = st.text_input("Enter your name")

if name:
    st.write(f"Welcome, {name}!")
That’s it — you have a working Streamlit app right there.
Working through the example…
It’s a pretty simple application, but let’s work through it line by line to see what it’s doing.
Streamlit allows you to define everything that’s shown to the user with simple calls to functions that it provides.
| Python | What it does |
|---|---|
|
This tells the application to use the `streamlit` package from the virtual environment, and to refer to it as `st` (making your code a little more concise!)
Everywhere you write |
|
Sets the title of the page to "My Data Prototype" by calling the `streamlit.title` function with a single argument: the new title of the page. |
|
Prints some wording to the page for the user to read, by calling the `streamlit.write` function with a single argument: the wording to display.
|
|
Calls the `streamlit.text_input` function to shows a simple prompt for the user to fill in with text. Here the single argument is the text to show the user, relating to the prompt:
When the user enters a value, this is put into the On first run, the |
|
This is a call to the `streamlit.write` function again, but it's in a block that's governed by an `if` statement, which tests the `name` variable.
Here’s why:
|
There’s plenty more to learn about Streamlit, but for now, it’s helpful to understand what it’s doing at a basic level.
What if the user changes the name they provide?
When an input changes, Streamlit re-runs the application from the start. This means that the new value for name is picked up on the line that assigns it:
name = st.text_input("Enter your name")
That new value then evalutes to True in the if-statement, the block runs, and the UI shows the welcome message.
4. Run the application
streamlit run app.py
A new tab will open in your browser showing your app at http://localhost:8501. (Streamlit will use port 8501 by default, but you can change that if you need.) Any changes you save to app.py will automatically be refreshed in the browser.
| VS Code | Your application |
|---|---|
 |
 |
5. Stop the application
Go back to the terminal where the app is running and press Ctrl+C. The app will stop.
Excluding the virtual environment from Git
Your .venv folder contains thousands of files that Git shouldn’t track. Whenever anybody else uses your project, they can initialise their own virtual environment, and this means you won’t end up paying to store volumes of open source code in your git repository that anybody could retrieve for themselves.
Create a .gitignore file to exclude it.
You could create the file yourself, with a single line in it:
.venv/
or you could use a simple command in the terminal to create it:
echo ".venv/" > .gitignore
Making your first commit
Ok - you’ve created a simple Streamlit app, and we’re ready to push it to your repository for safe-keeping. For now, we’ll work on the main branch - it’s just you working on the project, and this means you don’t need to perform branch-gymnastics just to add some basic code.
In the terminal, type (or copy/paste) each of these lines, and review their output.
Add all changed files to staging. Staging contains files under consideration for the next commit:
git add .
Create a new commit, with a commit message, composed from all the changes in staging right now:
git commit -m "Add a simple Streamlit data prototype"
Push all new commits from your local repository to the remote:
git push
NB. If this is the first time you’ve pushed to a remote repository, git may ask you to set up tracking between your local branch and the remote equivalent. You’ll see a prompt inviting you to use a variant of the
pushcommand. Because we’re working with themainbranch, it might look like this:git push --set-upstream origin main
Reload the page for your repository on GitHub, and you should see app.py and .gitignore have been added. (By default, GitHub will show you the main branch of your repository.)
What, no AI?
You’re absolutely right, buddy! We have gone 2 whole tutorials without using the AI coding assistant you set up in the first. That’s intentional.
Once you’re familiar with the core tools, it’ll be much easier to give an AI assistant clear directions, and to review the code it creates. It’s important to have an idea about what you’re making so you can be responsible for it.
This is your code, and you are responsible for it
AI coding assistants are great but, just like people, they can make mistakes. They may not understand your intent, or they may write code that seems to work but fails in unexpected ways. It’s important to be sure that new code really does what it’s supposed to do before it goes into the project.
In future tutorials we’ll look at how to write automated tests that prove your code does what it’s supposed to do.
Learning Python
There are plenty of Python tutorials available, and I recommend that as a part of continuing with this tutorial series, you find one that works for you.
Some helpful commands
| Step | Command |
|---|---|
| Create virtual environment | python3 -m venv .venv |
| Activate it | source .venv/bin/activate |
| Install Streamlit | pip install streamlit |
| Run the app | streamlit run app.py (stop with Ctrl+C) |
| Add, commit, and push | git add ., git commit -m "...", git push |
Summary
You now have a running, version-controlled prototype.
Coming up…
In future tutorials, we’ll start working with an AI assistant to:
- add some simple logic, and automated tests to prove that your code does the right thing
- add the exciting features: data processing logic, visualisations, and interactivity
We’ll also be:
- documenting your code, as you go, to help others
- thinking about how to break your work into manageable tasks
- thinking about how to protect user data
My biggest recommendation
Don’t start working with real data about people until you’re sure you’ve got a good handle on what your responsibilities are, and how you’ll keep that data safe. We’ll explore those topics together in future tutorials.