In part 1, we set up the basic infrastructure to support a new Lambda function on AWS; and n this part, we’ll build a Lambda function, deploy it to AWS, and invoke it with some input.
Let’s build an AWS Lambda in C#
Part 2: Building your Lambda
You’ll need to install:
We’ll work from a basic template for the .NET CLI, which you’ll need to install:
dotnet new -i Amazon.Lambda.Templates
To push updates from your machine to the AWS Lambda service, you’ll also need the Amazon Lambda tools for the .NET CLI:
dotnet tool install -g Amazon.Lambda.Tools
Prerequisite tokens
Your administrator account has an access key id, and a secret access key. You’ll need both to set up an AWS profile locally, and you should be able to retrieve them from the IAM service in the AWS console.
While you’re in the console, note down the region you’ve been working in, eg. eu-west-2
Creating a local AWS profile
A profile for the AWS CLI contains enough credentials and information to be able to perform actions on AWS on behalf of a particular IAM user.
The AWS CLI offers an interactive way to configure a new profile. You can name the profile anything, but it’s often helpful to name it after the user it represents, ie. sample-admin
aws configure --profile sample-admin
Provide details as requested, including the access key id, secret access key, and region from above.
If you’ need to inspect your credentials, you’ll find them in these files:
~/.aws/config~/.aws/credentials
We’ll use this profile later when uploading your Lambda code to AWS.
Create a Lambda solution from a template
Before jumping into your favourite IDE, we’ll use the .NET CLI to create a project from the template we installed earlier.
Create a new folder for the whole solution and, from there, run:
dotnet new lambda.EmptyFunction --name SampleLambdaFunction
In fact, this has created two projects: one for the lambda, and the other to test it.
You may wish to move the projects around into a structure that makes sense to you. Now is a good time for that. (I usually prefer to have all my projects in directories directly inside the main solution directory - but I’ve accepted the src/ and test/ directories that the template provides this time.)
- Fire up your favourite .NET IDE (Visual Studio, or Visual Studio Code are both good recommendations) and create a new Solution in your solution folder.
- Add both the existing projects to your solution.
- Add a reference from the test project to the main project if it’s not already linked.
Examine the template Lambda
Inside the SampleLambdaFunction project is a file called Function.cs - this contains the entry point for your Lambda:
public string FunctionHandler(string input, ILambdaContext context)
As you can see, this method has 2 parameters:
input - This is a string by default, but you could exchange it for any object.ILambdaContext - This context object allows you to access information about the Lambda’s environment, and also to write logs.
The template Lambda accepts a string as input. If you need to, you can specify a regular class for your input. AWS will accept JSON and deserialize it into an object for you.
Note that C# serializes and deserializes objects using public properties, so if you’re replacing that string with an object of your own, make sure the values you want to see mapped to and from JSON are public properties, ie.
public int Number { get; set; }
The template Lambda function returns an uppercased version of the string passed in.
You could also adjust the return type of this function and return an object class. If you do, the AWS libraries will serialize it and return it as a JSON string.
Deploy and test the template Lambda
To deploy the Lambda using the CLI, we’ll use the dotnet lambda tool that you installed earlier, from the terminal. First build, and then deploy the lambda.
See deploy.sh (in the sample project), or use the invocation below:
dotnet build
pushd src/SampleLambdaFunction
dotnet lambda deploy-function --profile sample-admin --region eu-west-2 SampleLambdaFunction --function-role sample-lambda-role
popd
You could also achieve this directly from Visual Studio with a little configuration. The sample Lambda project’s Readme.md has some information about that.
Having succesfully deployed it, you can test it with the dotnet lambda tool, too.
See test-a-string.sh (in the sample project), or use the invocation below:
dotnet lambda invoke-function SampleLambdaFunction --profile sample-admin --region eu-west-2 --payload 'a rather lower-case string'
NB. There are plenty of ways to invoke a Lambda function. I’d recommend reading a little more about how it’s done at: Invoking functions
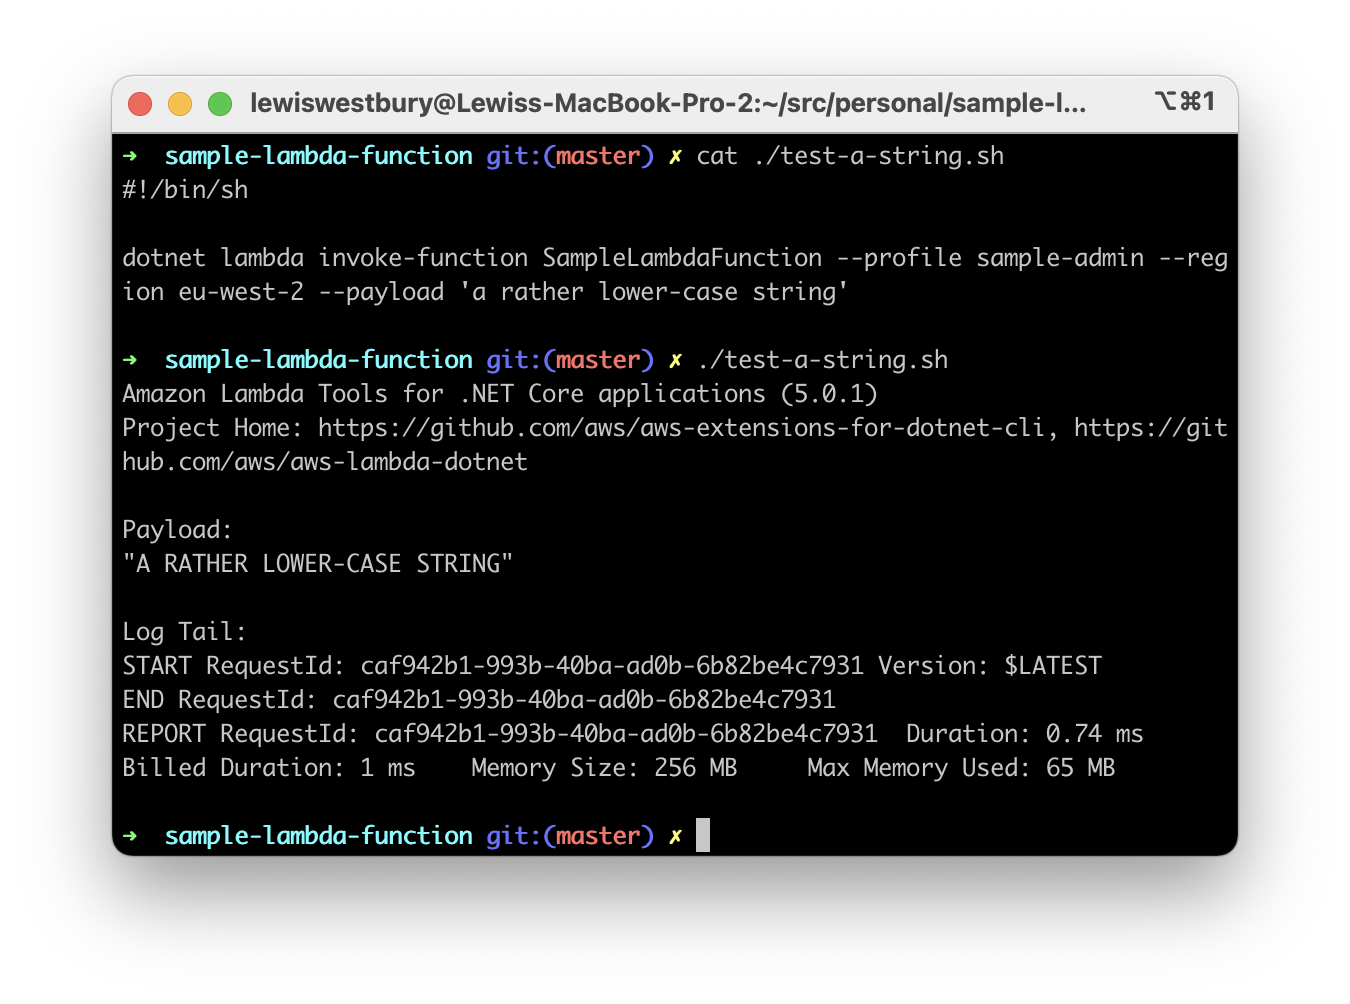
In the output, you should see a response, with your input string upper-cased:
A RATHER LOWER-CASE STRING
Conclusion
Congratulations! You’ve built a Lambda that runs on AWS infrastructure. You sent it a message, it did some work, and returned a response.
In the next part, we’ll enhance the Lambda to collect data from an API, and provide it with a secret API key to do so.