
instantiator.dev
tech, volunteers, public safety, collective intelligence, articles, tools, code and ideas
- Presence (tool) (in dev)
- ListSky (tool) (in dev)
- The Epistolorean (service)
- Consensus Games (service) (in dev)
- JSON to Smart CSV (tool)
- Escape the Review (profile)
- In this house... (calendar)
- A chat with Lewis (call)
Building AI into your application with Semantic Kernel
tutorialThis is a quick guide to some of the features of the Semantic Kernel, a Software Development Kit that simplifies integration of language models into your own applications.
The Semantic Kernel
The Semantic Kernel is in pre-release, and that means it’s not complete, and has plenty of improvements coming. Nevertheless, it’s a nice tool for interacting with the Large Language Models (LLMs) available from OpenAI, and Azure OpenAI. You can add it to your .NET projects as a library through NuGet, and once installed it makes the complex business of interacting with these APIs simple.
I work in C# but Semantic Kernel has support for several languages: C#, Python, and I’m given to understand Java (soon!)
Concepts
The Semantic Kernel understands two kinds of operation:
- Semantic functions - capabilities expressed as instructions in human language
- Native functions - additional capabilities written as code that can be executed locally
These functions are grouped together into Skills - and a skill can have any number of semantic or native functions.
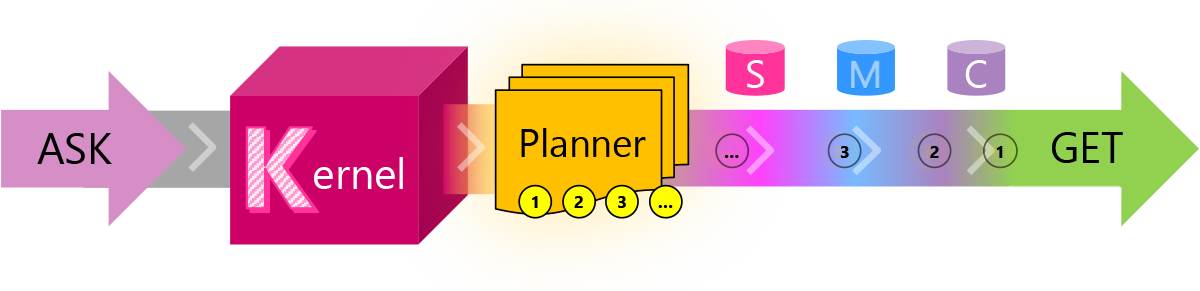
The Kernel also has a Planner, which can decide which functions to chain together to complete an Ask (a request made to it in human language).
Caveat: Treat everything in this article as a simplification. There’s plenty going on beneath the surface of the Semantic Kernel that I don’t pretend to understand. For instance, I have some very rudimentary guesses about what the Planner is doing - but it’s likely to be a lot more sophisticated than that.
The Kernel also has some really interesting capabilities relating to Memories and Connectors that I’ve not touched on yet. I’ll save it for a future post…
Getting started
If you want to jump into a solution you can play around with, check out this repository:
All you need do is provide it with an OpenAI key to get started. Run it and it’ll execute a quick test for you, calling on the Planner to arrange a plan that uses several functions defined in the solution.
What follows is a quick walk-through of what it’s doing…
Walk-through
Configuration
Everything starts in SKE.Program.Main() - the entrypoint for this console application.
First, it retrieves config from the .env and .secret.env files, and uses that config to build the kernel.
// configure and create the semantic kernel
var config = RetrieveConfiguration();
var kernel = BuildAndConfigureKernel(config);
private static IKernel BuildAndConfigureKernel(IConfigurationRoot config)
{
    var kernel = Kernel.Builder.Build();
    kernel.Config.AddOpenAITextCompletionService(
        config["serviceId"]!,
        config["modelId"]!,
        config["apiKey"]!);
    return kernel;
}
The Kernel configuration is pretty simple - it just wants to know the service and text completion model it should be using, and an API key to be permitted to access it.
Skills
The Kernel is then used to import the skills defined in the project, and the Planner - a special skill provided by Semantic Kernel.
// import defined skills, and the planner
kernel.ImportAllSemanticSkills("Skills");
kernel.ImportAllNativeSkills();
var planner = kernel.ImportPlannerSkill();
The various Import* methods are defined as extension methods for IKernel in SKE.KernelSkillsExtensions.
Semantic functions
Semantic Functions are imported from their position in the skills directory tree. Each Skill has its own directory, and each function has a directory within there.
In this solution, all Skills are grouped inside the Skills directory:
kernel.ImportSemanticSkillFromDirectory(scanDirectory, skill);
Each Skill contains two files:
skprompt.txt- the instructions for a text completion model that represent this capabilityconfig.json- various pieces of information used to fine tune the function
config.json is optional, however of all the information in that file, the description text is important for the Planner, as it needs it to understand what the function does.
eg.
skprompt.txt
Reverse the meaning of the following, giving the opposite effect to the original intention.

---Begin Text---
{{$input}}
---End Text---
and
config.json
{
  "schema": 1,
  "type": "completion",
  "description": "Reverse the meaning of the text",
  "completion": {
    "max_tokens": 512,
    "temperature": 0.0,
    "top_p": 0.0,
    "presence_penalty": 0.0,
    "frequency_penalty": 0.0
  },
  "input": {
    "parameters": [
      {
        "name": "input",
        "description": "Text to reverse the meaning of",
        "defaultValue": ""
      }
    ]
  }
}
Native functions
Conversely, Native functions are imported by providing an object from a class containing a number of methods marked with the [SKFunction] annotation.
In this solution, they are detected by reflection - and then each class identified as a Skill is instantiated and imported:
kernel.ImportSkill(skillObject!, type.Name!);
In this solution we define a simple native function:
public class CharacterManipulationSkill
{
    [SKFunction("Return the text in all uppercase (aka capitals)")]
    public string Uppercase(string input)
        => input.ToUpper();
}
It’s pretty clear what it does to you or I by inspection of the code. Note that the SKFunction annotation contains a description of the function as its parameter. The Planner needs this to understand the function, so that it can incorporate it into any plans.
The planner
Finally, the Planner itself is imported:
kernel.ImportSkill(new PlannerSkill(kernel));
This is interesting - the PlannerSkill is passed an instance of the Kernel, and I believe that’s because it need to be able to learn which Skills the Kernel has imported, in order to be able to reason about them.
Creating a plan
Once configured and with all the skills available to the Planner, the code goes on to prepare an ask - a plain language request for the Kernel.
This solution uses a very simple, fixed ask to help illustrate how the skills can be used together:
// provide a simple input and ask as an example
var input = "Yesterday I went to the London Prompt Engineers jam at Newspeak House. Brilliant to meet folks who want to experiment with the new technologies, and a great opportunity to muck out with Semantic Kernel. Can't recommend highly enough!";
var ask = $"Reverse the following and then deliver it as cockney rhyming slag in all caps: {input}";
WIth the ask constructed, the Planner can be invoked to create a plan:
// create plan for the given ask
var plan = await kernel.CreatePlanAsync(planner, ask);
Again, this takes place in an extension method - this time it’s an async invocation, as the Kernel will be making calls to the remote LLM to complete the plan:
await kernel.RunAsync(ask, planner["CreatePlan"]);
Executing the plan
Finally, the Kernel is asked to execute the plan:
// execute the plan
var result = await kernel.ExecutePlanAsync(planner, plan);
Again, this is covered in an extension method, but this conceals quite a bit of complexity:
public static async Task<string?> ExecutePlanAsync(this IKernel kernel, IDictionary<string, ISKFunction> planner, SKContext plan, int maxSteps = 10)
{
    string? result = null;
    var executionResults = plan;
    var partialResults = new List<string>();

    int step = 1;
After a little set up, it starts a while loop - which will stop when the plan is complete, or has exceeded the maximum number of permissible steps…
    while (!executionResults.Variables.ToPlan().IsComplete && step < maxSteps)
    {
It executes the next step found in the plan (stored in executionResults). These execution results double as the output from executing a step, and information about execution of the plan itself.
        // execute the next step found in execution results
        var results = await kernel.RunAsync(executionResults.Variables, planner["ExecutePlan"]);
Then, assuming that the execution was successful, the output from the current step is captured in result, and also added to the partialResults list (mainly for debugging purposes).
If execution failed, this is where the method throws a PlanExecutionException, which contains all the debugging information available right now.
        if (results.Variables.ToPlan().IsSuccessful)
        {
            result = results.Variables.ToPlan().Result;
            partialResults.Add(result);
        }
        else
        {
            throw new PlanExecutionException($"Step {step} execution failed.", plan, step, partialResults);
        }
Finally, results from the current step’s execution are put into executionResults, which will be used to provide the next step of the plan when the loop iterates.
        // iterate - using the execution results as the input for the next step
        executionResults = results;
        step++;
    }
When the loop has completed, if it has not thrown an exception, then there should be a final result in result…
    return result;
}
The final line of Program.Main prints this final result to the console:
Console.WriteLine($"Result:\n\n{result}");
Doing it right
As with all other applications for Machine Learning, using Large Language Models to solve problems comes with hurdles and caveats.
Take the time to read the Responsible AI Transparency Note provided with the Semantic Kernel documentation.
An AI system includes not only the technology, but also the people who will use it, the people who will be affected by it, and the environment in which it is deployed. Creating a system that is fit for its intended purpose requires an understanding of how the technology works, what its capabilities and limitations are, and how to achieve the best performance.
Think hard about how you will apply artificial intelligence and machine learning to your problems, and don’t be afraid to speak out if you see a risk to any users. Aim to build tools that help everyone equally, and take the time to eliminate bias wherever it may creep in.
Let’s mitigate bias in tech by Leslie Chapman is a good read.
Try this exercise: gather ten people and have each one put together a list of what they think a truly diverse pool of users looks like. Then compare notes. I bet everyone has someone that they’ve missed on that list.
No company sets out to create a product that’s going to be called “racist” – but it happens over and over again. You can be the voice that helps your company avoid that from ever taking place.