
instantiator.dev
tech, volunteers, public safety, collective intelligence, articles, tools, code and ideas
- Presence (tool) (in dev)
- ListSky (tool) (in dev)
- The Epistolorean (service)
- Consensus Games (service) (in dev)
- JSON to Smart CSV (tool)
- Escape the Review (profile)
- In this house... (calendar)
- A chat with Lewis (call)
Rainbow paws
article_Art is fun and hard and messy and complicated and like every other trade it’s full of people who are earnestly showing you what they created (sprinkled with a few jokers)._
I still like to pretend I don’t really know art when I see it, but I think I appreciate the effort people put into their work. There are ways to recognise that. You could know a little about the medium, or you could ask the creator to talk about their work and listen for the passion to shine through.
This is sometimes very clear when visiting escape room venues. If you’re fortunate enough to meet the owner of a venue, and they choose to walk you through the game afterwards - telling you how it works, how it was made, and what they were thinking of when they designed the puzzles - you’ll know that the game you’ve just played was special, a labour of love.
The Cat with Rainbow Coloured Paws
Since it was first launched, I’ve made a few little bits and pieces with the @BBCMicroBot. It’s a Twitter bot that runs the programs you send to it on an emulated BBC Micro computer from 1981. (I’m also from 1981, and that tickles me pink!)
Here’s one I created called Rainbow Paws, inspired by a childrens book I loved once - The Cat with Rainbow Coloured Paws. (Apologies for the Amazon link - I couldn’t find it on bookshop.org.)
Source: https://t.co/35UkN202Hm pic.twitter.com/L7r9C39l0Y
— BBC Micro Bot (@bbcmicrobot) June 28, 2021
The constraints are what makes this a fun challenge. The computer itself has just 32k of RAM (1/32 of a Mb) to work with (although you’d never fill it up with just a Tweet’s worth of code), and runs incredibly slowly by modern standards. The default language is BBC BASIC. It’s an interpreted language (so it runs even slower). The bot starts your program, runs for 30 seconds, and then records a short clip. (If nothing moves, it makes a PNG, otherwise an animated GIF.)
You can see see the whole design draw itself by launching it on a BBC Micro in your browser.
BASIC is a pretty verbose language, although lots of the commands have abbreviations. Lots of the instructions are English words, and so to help fit as much as possible into a single tweet, people do something called Code Golfing (hat tip @P_Malin) - it’s artful, trying to squeeze as much meaning as possible into as little text as possible.
So what am I doing here? Rainbow Paws barely scratches the surface of code golfing, but it does illustrate some fun techniques in graphics.
Each paw is created from 5 circles, representing half of the main pad and two toes, mirrored to make a complete paw (saving vital space in the tweet for the rest of the code).
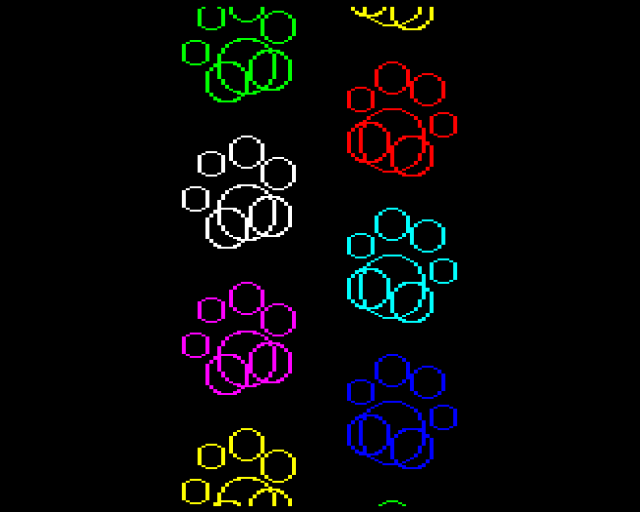
And each paw is drawn at a slight angle. So how do you rotate things? This is geometry computer graphics 101…
2D rotation around a point
The steps are pretty straightforward:
- Calculate the SIN and COS of the rotation angle, you’ll need both twice.
- Subtract the pivot point, so that the rotation happens around the origin (0,0).
- Calculate new X and new Y values, with this formula:
X = (X * COS(radians)) - (Y * SIN(radians))Y = (X * SIN(radians)) + (Y * COS(radians))
- Add back the pivot point, so that rotation took place around the pivot.
It’s absolutely ok to treat those formulae for new X and new Y as magic.
Here’s an example, provided in C# as I think it helps to make things a lot clearer.
/// <summary>
/// Rotates a point around a pivot.
/// </summary>
/// <param name="start">a point to rotate</param>
/// <param name="pivot">a point to rotate the start point around</param>
/// <param name="radians">amount to rotate the point (radians from from 0 to 2*PI)</param>
/// <returns>the start point, rotated around the pivot point</returns>
private static PointD Rotate(PointD start, PointD pivot, double radians)
{
    // calculate the SIN and COS of the rotation in radians
    // these are used twice each
    var s = Math.Sin(radians);
    var c = Math.Cos(radians);

    // subtract the pivot - so that we're rotating around (0,0)
    var adjusted = new PointD(
        start.X - pivot.X,
        start.Y - pivot.Y);

    // new x = (x * c) - (y * s)
    // new y = (x * s) + (y * c)
    var rotated = new PointD(
        (adjusted.X * c) - (adjusted.Y * s),
        (adjusted.X * s) + (adjusted.Y * c));

    // add back the pivot - to restore distance from the rotation
    var result = new PointD(
        rotated.X + pivot.X,
        rotated.Y + pivot.Y);

    return result;
}
This example assumes that there’s a class or struct called PointD, which has X and Y properties. You could just as easily implement it with the commonly available PointF.
Squeezing it all in
Providing coordinates, colours, and instructions to draw every paw in the picture wouldn’t fit into a tweet. So I’m doing some work to fit it all in.
I’ve represented the sizes and locations of all the circles as simple integers, and between 0 and 99. That way I’m using as few characters as I can to represent each point. I then rescale them later when I need them.
D.0,0,30,-23,-10,20,-20,60,15,-45,30,13
At the beginning of this line, D. actually represents DATA - a way to store small amounts of data alongside the program. Each circle in the paw is represented by a triplet: centre x, centre y, and radius. This represents 4 circles: 2 parts of the main pad, and 2 toes. As mentioned, they’re mirrored to draw a full paw print.
Using VDU code 29 we can move the origin around the screen, and this means we can draw each rotated paw without having to do the pivot point calculation. All rotations are just around the origin. (On the BBC Micro, the virtual screen resolution is 1280x1024.)
This code calls V.29 (actually VDU 29) with fresh coordinates to shift the origin, and then PROCb procedure b - which actually draws a rotated pad with the angle provided to it (here 0.3 or -0.3):
V.29,640-T%;Y;:PROCb(0.3)
V.29,640+T%;Y+T%;:PROCb(-0.3)
As you can see that’s all in a FOR-loop (everything between F. (FOR) and N. (NEXT)) which allows it to climb the screen as Y increases with a STEP (S.) of 300:
F.Y=-300TO1024S.300
...
N.
In procedure b the code first picks a colour as C% MOD 7 (the difference after dividing global variable C% by 7) + 1 (so that the colour is always in the range 1-7, not 0-6):
GC.0,C%MOD7+1: ... :C%=C%+1
Here GC. stands for GCOL - a command to pick the graphics colour. GCOL 0,colour selects the chosen colour in its simplest possible paint over the top of anything mode (0).
In between those colour operations are two calls to PROCc. Procedure c actually draws the paw.
First, it resets reading of all data to the start of the program. (RES. is short for RESTORE.) Then it draws each of 4 circles.
PROCp(a,f):V.25,4,X%;Y%;25,&99,FNr;0;
In procedure p, it reads the next point’s data - its X and Y. Then it scales the X value by f (here either 1 or -1 for mirroring). Then it does the rotation calculations, and places the result in global variables X% and Y%:
READx,y:x=f*x*2:y=y*2
X%=x*COS(a)-y*SIN(a)
Y%=x*SIN(a)+y*COS(a)
It’s really important to note that doing this sort of thing (changing global variables from called methods) is considered Very Bad Practise Indeed - as these sorts of changes are difficult for other coders to perceive in your code when they call your methods. It’s fine for code golfing though! A lot of what goes on here is purely to try and squeeze the behaviour we want into a very small amount of code.
Back in procedure p the V.25,4 (VDU 25,4) moves the origin - this time relatively by X% and Y%, so that the centre of each circle is where the next pad should be. Finally V.25,&99 draws a filled circle, with radius calculated by FNr (function r).
And that’s it! I made a cute little picture, squeezed the instructions into a tweet, and even if the fine detail isn’t very important to you, hopefully the idea of the challenge is fun.
Epilogue
The internet is a fun place where people can iterate on each others’ work. I would be remiss not to point out the cool improvements @rheolism made to the original tweet. Here:
Source: https://t.co/j1u5xXYkTe pic.twitter.com/vToQxSobiQ
— BBC Micro Bot (@bbcmicrobot) June 29, 2021